Appearance
Mint NFTs With API Calls On Layer 2
Introduction
Dive into the process of minting NFTs on Layer 2 using API calls with our step-by-step guide. Here’s what you’ll learn:
- Deploy an ERC721 mintable smart contract on Dashboard
- Mint new NFTs on Layer 2
- Upload metadata and image file
- Verifying metadata
Deploy an ERC721 mintable smart contract on Dashboard
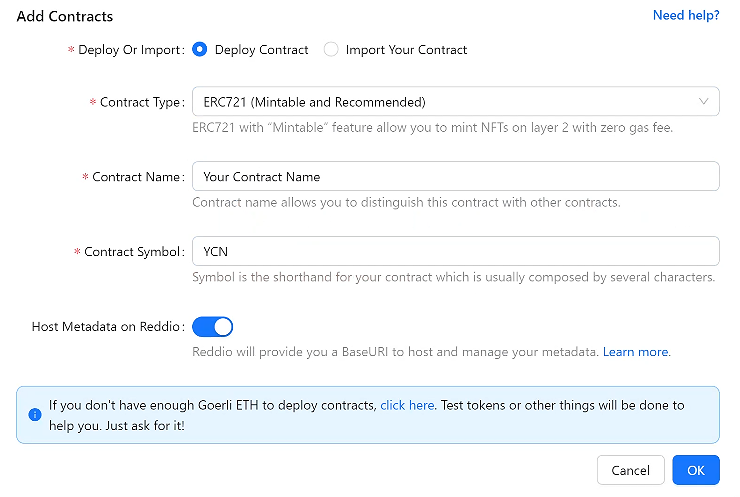
You can easily deploy an ERC721M smart contract on layer 1 by utilizing RedSonic's Dashboard. Once you have registered on the dashboard, navigate to the contracts page and click on the "Add Contracts" button. Select ERC721 (Mintable and Recommended). And then, you need to type in all the information about this contract then click "OK":
Then, your wallet will pop up to prompt you to sign the transaction. Once you have successfully signed all the transactions, your deployment will be processed.
After your deployment process is finished, you will see your new contract name under "Contracts" page:

To further explore the smart contract details on layer 1, you can refer to the comprehensive guide provided by RedSonic, which will guide you through the process of checking the smart contract details on Etherscan.
Mint new NFTs on Layer 2
If you're looking to mint new NFTs on Layer 2, this guide will walk you through each step of the process. Before you get started, ensure you have the following details handy:
- Contract Address: This can be found on your Dashboard under the contract page.
- API Key: Located within the "Config" page of the Dashboard.
- stark_key: This will be required to receive the minted NFTs.
Once you've gathered the above, follow the steps outlined below:
1. Configure your API Endpoint
- URL:
https://api-dev.reddio.com/v1/mints - Method:
POST
2. Set Headers for the Request:
content-type:application/jsonX-API-Key: ReplaceYOUR_API_KEY_HEREwith your actual API key.
3. Construct the Request Body
You will need to format your request body in JSON. Here's a template:
json
{
    "contract_address": "YOUR_CONTRACT_ADDRESS",
    "stark_key": "YOUR_STARK_KEY",
    "amount": "DESIRED_AMOUNT"
}
Replace the placeholders with the appropriate details:
contract_address: Insert the contract address you registered and intend to mint to.stark_key: Add your stark_key.amount: Specify the quantity of tokens you wish to mint (up to a maximum of 100).
4. Transmit the Request
Utilize an API testing tool or an HTTP client of your choice (like Postman or cURL). Direct a POST request to the above-mentioned URL with the headers and body you have prepared. To help you understand better, here's how you might send the request using cURL:
bash
curl --location --request POST 'https://api-dev.reddio.com/v1/mints?contract_address=0x97EE3E6C6b98abDB29a5dd3d1936997b4dA76097&stark_key=0x1baf1b9991271727e8ebabf242cb5c707ae72f356481908a344109c08f11c3&amount=1' \
    --header 'content-type: application/json' \
    --header 'X-API-Key: rk-85cfdc4d-683b-4bfa-xxxx-cbfa2c1a6334' \
    --data-raw '{
        "contract_address":"0x97EE3E6C6b98abDB29a5dd3d1936997b4dA76097",
        "stark_key":"0x1baf1b9991271727e8ebabf242cb5c707ae72f356481908a344109c08f11c3",
        "amount":"10"
    }'
5. Await the Response
Once you've sent off your request, you'll receive a server response. A typical successful response will resemble:
json
{
    "status": "OK",
    "error": "",
    "error_code": 0,
    "data": {
        "sequence_ids": [
            614611,
            614612,
            614613,
            614614,
            614615,
            614616,
            614617,
            614618,
            614619,
            614620
        ]
    }
}
This response indicates that your NFTs have been successfully minted. Ensure you store or note down any pertinent details for future reference.
How to Create Metadata for a Specific Token ID
Creating metadata for a specific token ID can help provide more details about the token, making it easily recognizable and comprehensible. Here's a step-by-step guide based on the provided API documentation:
Prerequisites:
- Contract UUID: This is a unique identifier for your contract.
- Token ID: The specific ID of the token for which you want to create metadata.
- Name: A name for your token.
- Description: A brief description or overview of your token.
- Media: An image to represent this token.
- Additional Key-Value: Metadata other than name,description, media. Check here to learn more.
Steps:
API Endpoint Configuration
- URL:
https://api-dev.reddio.com/v1/project/contract/:contract_uuid/metadata(Replace:contract_uuidwith your actual contract UUID) - Method:
POST
- URL:
Prepare the Request Body
You will be using a formdata type for the request body. Depending on the tool or library you are using to make the request, the way to send formdata might slightly differ. However, here's a generic structure:
token_id: Your Token IDname: The name you have chosen for your token.description: Your token's brief description.media: The image associated with your token.additional_kv: Other key value that will store on metadata.json.
Send the Request
Using an API testing tool or HTTP client of your choice (e.g., Postman or cURL), send a POST request to the specified URL with the formdata you prepared in the previous step.
Note: Ensure that you set the content type to
multipart/form-dataif required by your API testing tool.To help you understand better, here's how you might send the request using cURL:
bash
curl --location --request POST 'https://api-dev.reddio.com/v1/project/contract/{Your contract UUID}}/metadata' \
    --header 'X-API-Key: rk-85cfdc4d-683b-4bfa-xxxx-cbfa2c1a6334' \
    --form 'token_id="17"' \
    --form 'name="NFT Name"' \
    --form 'description="NFT Description"' \
    --form 'media=@"/C:/image.png"' \
    --form 'additional_kv="{\"power\":162,\"health\":100}"'
Receive the Response
Once you've submitted the request, you'll receive a response from the server. A successful response will look like this:
json
{
    "status": "OK",
    "data": {
        "message": "Metadata uploaded."
    },
    "error": null
}
That's it! You've now set up metadata for a specific token ID using the API.
Verifying metadata
Once you've uploaded metadata and its corresponding image for a specific token ID, it's essential to verify that the process was successful. This guide will walk you through how to verify the metadata using RedSonic's Dashboard:
Access the Dashboard:
- Begin by navigating to RedSonic's Dashboard.
Locate the Relevant Contract:
- Once you're on the dashboard, head over to the contracts page.
- Browse through the list of contracts until you find the one to which you recently uploaded metadata and an image.
Inspect the Metadata:
- Click on the contract you identified in the previous step.
- Navigate to the "metadata" tab. Here, you'll be able to see the metadata details.
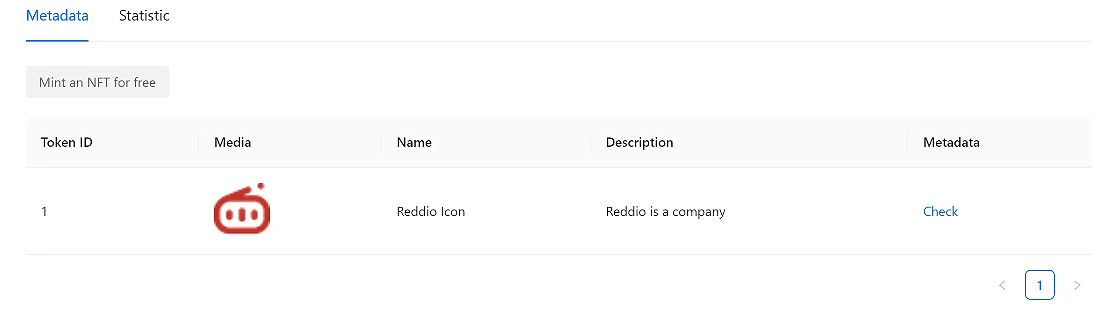
- Verification:
- If you can see the image associated with the metadata you uploaded, congratulations! It means your metadata was successfully uploaded to the platform.
Remember to periodically check RedSonic's Dashboard for updates or any changes to the metadata verification process.