Appearance
Publish your ERC20 project to Mainnet
Introduction
In this guide, we will explore various facets of deploying your ERC20 project on the Ethereum mainnet. Our comprehensive overview will include:
- Why you meed to publish ERC20 on RedSonic
- Steps to publish ERC20 to mainnet (Ethereum)
- How to monetize your project
Why you meed to publish ERC20 on RedSonic
If Gas fees remain high, it's costly for both the project owners and users. This issue is not only present with NFTs but also with ERC20 tokens. Every day, we see hundreds of ERC20 projects being created and transacted on Ethereum.
Typically, the number of transfers and transactions of ERC20 tokens is much larger than that of NFTs. ERC20 offers more flexibility and better liquidity than NFTs.
When you want to tokenize your project, various transfers or swaps are inevitable. We can see from the screenshots in the previous article that the fees for transfers and transactions are not low.

Comparatively, the cost of ERC20 might even be higher than NFTs. However, now you and your users don't have to spend so much on transaction fees. RedSonic offers a 0 gas fee solution that ensures smooth transactions with minimal costs.
Steps to publish ERC20 to mainnet (Ethereum)
Prerequisites
- Have an Ethereum wallet and sufficient ETH to pay for Ethereum's gas fees (typically around 0.05 eth).
- Registered a RedSonic account on the dashboard.
Steps to publish
- Log into the dashboard, which will automatically redirect to the default project. You can also create or select another project. In most cases, the default project should suffice.
- Click on 'Deploy / Import Contract' in the top left corner. A form will pop up.
- Fill in the necessary fields:
- For 'Deploy or Import', choose 'Deploy Contract'. 'Deploy Contract' means to release a contract, while 'Import Your Contract' means to import a previously created contract. Since we're launching a new project on the Ethereum mainnet, select 'Deploy'.
- For 'Contract type', choose 'ERC20' to indicate you're selecting an ERC20 token.
- 'Contract Name' and 'Contract Symbol' are the name and symbol of your project. Fill them out accordingly.
- For 'Network', select 'Ethereum Mainnet'. Choose 'Ethernum mainnet' since we're deploying on the mainnet. If you just want to test, you might consider 'Goerli Testnet'.
- For 'Amount', enter the desired quantity. You might consider 1,000,000,000 (1B) tokens, but for this example, we're selecting 1,000 tokens.
- After completing the third step, the form will appear as follows.

- The remaining steps are identical to the ERC721 steps mentioned in the previous article. After the deployment, you can see that 1,000 tokens have been sent to your address as shown on the Dashboard.

- You will see the contract appears on the Dashboard as follow:
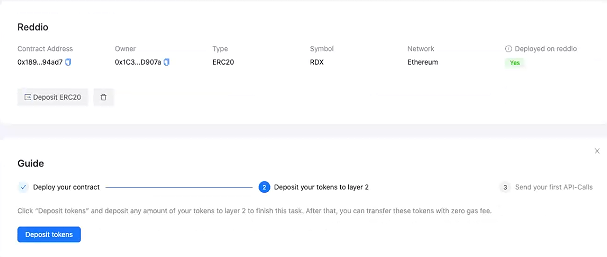
You've now successfully deployed your contract and have 1,000 tokens. Next, you can transfer them to RedSonic layer2 and consider using them as utility tokens to build your community.
How to Monetize Your Project
Similar to NFTs, launching ERC20 is just the first step of your operation. Here are some suggestions that might help increase user numbers and aid your operations:
- Rewards in tokens for minor tasks on games or official websites.
- Airdrop some tokens for valuable NFTs.
- Support user token swaps or simple exchanges.
- Collaborate with KOLs and some websites for promotions.
- Consider other operational methods like defi.