Appearance
Transfer NFTs Between Layer 1 and Layer 2
Introduction
This tutorial will guide you through the process of using the RedSonic API to deposit, transfer, and withdraw NFT between the Ethereum layer 1 and layer 2 blockchains using typescript.
You can get the Transfer NFTs Between Layer 1 and Layer 2. After you cloned the project in your device, you can use following prompts to install all the dependencies.
bash
yarn installAfter install all the dependencies, use following prompts to start the project:
bash
yarn startNow we will go over important components of our project.
Testing parameters
During your application implementation. There shall be a form asks for NFT contract address. For testing purpose only, we will use the REDDIO721 as an example. REDDIO721 is the NFTs we use in RedSonic’s demo. The REDDIO721’s contract address on Sepolia testnet is:
bash
0x941661bd1134dc7cc3d107bf006b8631f6e65ad5Connect to wallet
If you want to deposit, transfer, and withdraw tokens between the Ethereum layer 1 and layer 2 blockchains, you need to connect to your wallet first. We will use Metamask as an example to show you how to connect to the wallet and create Stark keypairs based on it. There’s one thing to note that one Metamask wallet address will generate the same Stark keypair.
tsx
async function connectToWallet() {
    if (typeof window !== 'undefined') {
      //First, get the web3 provider if window is not undefined
      const provider = new ethers.providers.Web3Provider(window.ethereum);

      //Second, we need to ask the wallet to switch to specific ETH network
      //We will use Sepolia testnet to give example.Its hexValue is 11155111.
      await provider.send("wallet_switchEthereumChain", [
        { chainId: ethers.utils.hexValue(11155111) },
      ]);

      //Third, getting the account addresses from provider
      await provider.send('eth_requestAccounts', []);
      const signer = provider.getSigner();
      const ethAddress = await signer.getAddress();

      //Finally, we can create a new reddio instance (Sepolia testnet)
      //And assign global variable to it
      const reddio = new Reddio({
        provider,
        env: 'test',
      });
      setReddio(reddio);

      const generateKey = async () => {
        try {
          //Generate stark private key and public key
          //Store them into array
          const { privateKey, publicKey } = await reddio.keypair.generateFromEthSignature();

          //We will set ethAddress/starkKey/privateKey on our array
          setEventValue({ ...eventValue, ethAddress, starkKey: publicKey, privateKey })
        } catch (error) {
          console.error(error);
        }
      };

      generateKey();
    }
  }
After you start the project. You will see a “Connect wallet” button in the main page, after clicking on the button. MetaMask will show up and ask you to login.
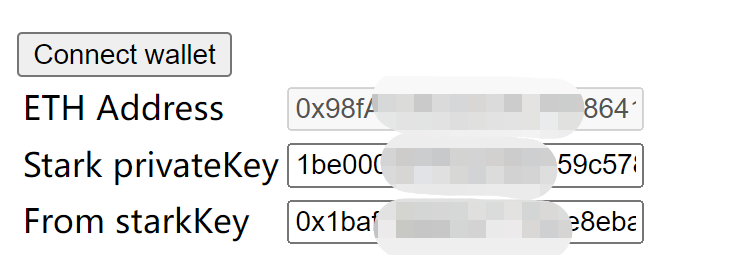
After login into your wallet, your address will be shown on the “ETH Address”. And your stark key and stark private key will be shown on the forms. If you see your wallet’s address, that means your wallet is successfully connected to the application.
Deposit: from layer 1 to layer 2
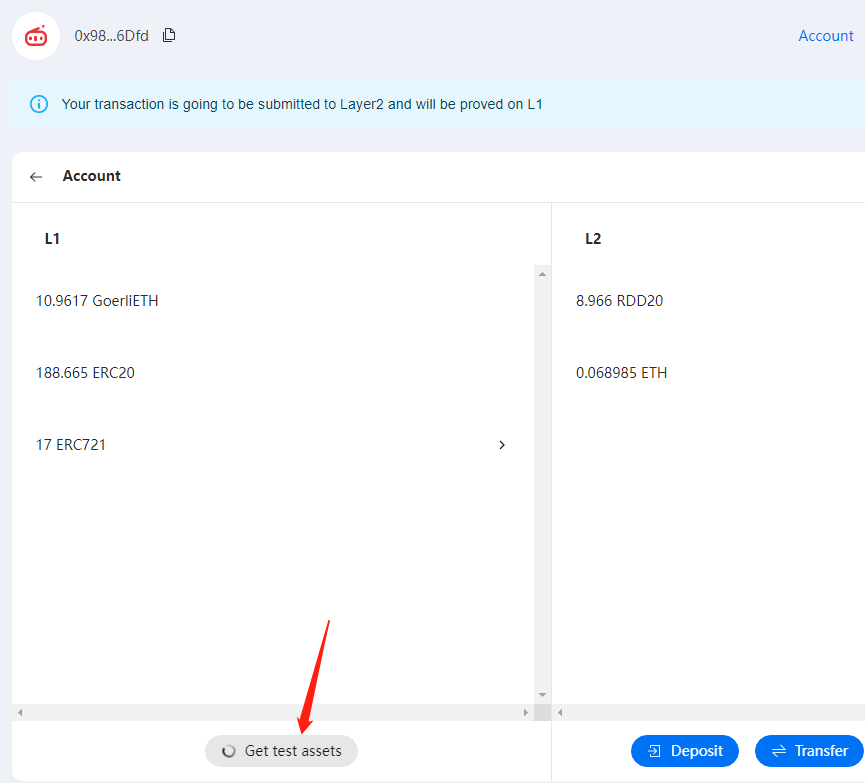
If you want to trade on layer 2, you need to have assets on layer 2. So you need to deposit your assets from layer 1 to layer 2 at first. You can get your own Sepolia test NFTs assets by going to the demo ‘s account page and click on “Get test assets” to get some test NFTs:
tsx
  async function depositNFT() {
    const { starkKey, contractAddress, tokenId } = eventValue;

    if (reddio !== null) {
      const transaction = await reddio.erc721.approve({
        tokenAddress: contractAddress,
        tokenId,
      });

      await transaction?.wait()

      //Deposit ERC721 into layer 2
      await reddio.apis.depositERC721({
        starkKey,
        tokenAddress: contractAddress,
        tokenId,
      });
    }
  }
After you write down the proper information on the forms and click on the deposit button, your MetaMask will ask you to confirm all the transactions. After that, you can check your balance.
Transfer: from layer 2 to layer 2
After deposit, you have your own NFTs on layer 2. Now you want to send the NFTs to others on layer 2.
Now, we will show you how to implement the transfer function in your application.
tsx
  async function transferNFT() {
    const { starkKey, contractAddress, tokenId, privateKey, receiver } = eventValue;

    if (reddio) {
      //Transfer NFT on layer 2 to another StarkKey
      const result = await reddio.apis.transfer({
        starkKey,
        privateKey,
        contractAddress,
        tokenId,
        type: "ERC721",
        receiver,
      });

      console.log(result);
    }
  }
After you write down the proper information on the forms and click on the transfer button. You can check a response from your console likes the picture down below:

Transfering NFT tokens on layer 2 is quick. You can check your balance very soon.
Withdraw: from layer 2 to layer 1
You already have a lot of NFTs on layer 2. You want these tokens back to your layer 1 wallet.
Now, we will show you how to implement the withdraw function in your application.
Typically, withdraw methods are composed by two steps: First, move assets to withdrawal areas or withdraw from layer 2.
The first step at least takes about 4 hour. You can check withdraw status here.
tsx
  async function withdrawNFTFromL2() {
    const { starkKey, contractAddress, tokenId, privateKey, receiver } = eventValue;
    if (reddio) {
      //Withdraw tokens from layer 2 (Move assets to withdraw area)
      //This process usually takes about 4 hour
      const { data } = await reddio.apis.withdrawalFromL2({
        starkKey,
        privateKey,
        receiver,
        type: "ERC721",
        contractAddress,
        tokenId,
      });
      console.log(data)
    }
  }
The second step is to withdraw the assets from layer 1. You can refer to guide here